If you have them, Printer Points are a great way to quickly match and balance shots or fix a bad white balance. They affect the whole image, not just a tonal range. Used in conjunction with the RGB parade they are very powerful.
What printer points are (taken from the Apple Color manual):
Employed by film printing machines, the printer points system allows color correction to be performed optically, by shining filtered light through the conformed camera negatives to expose an intermediate positive print, in the process creating a single reel of film that is the color-corrected print.
The process of controlling the color of individual shots and doing scene-to-scene color correction is accomplished using just three controls to individually adjust the amount of red, green, and blue light that exposes the film, using a series of optical filters and shutters.
Each of the Red, Green, and Blue parameters is adjusted in discrete increments called printer points (with each point being a fraction of an ƒ-stop, the scale used to measure film exposure). Color implements a standard system employing a total range of 50 points for each channel, where point 25 is the original neutral state for that color channel. Technically speaking, each point represents 1/4 of an ƒ-stop of exposure (one ƒ-stop represents a doubling of light). Each full stop of exposure equals 12 printer points.
Here’s why these are so great: since they affect the whole image (not a tonal range), they are fantastic for fixing bad white balance, which also generally affects the whole image. During my internship at EFILM, the colorists would have their color assistants go though the show before them, balancing and matching shots (essentially doing a rough primary correction) using only printer points. That way the assistant didn’t get carried away with the complexity of the correction and didn’t take up a lift/gamma/gain corrector that the colorist might need later. They also had great keyboard shortcuts mapped to the controls like this:
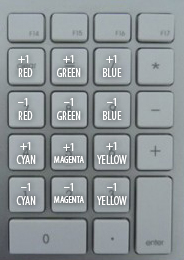
+ and - keys for RGB and CMY printer points
If you can map custom keyboard controls in your software, give this a try. It’s a super speedy way to balance, especially if you don’t have a panel. If you do have a panel, look around. Printer Points are probably on a pot (knob) somewhere.
Here’s an example of the shot I corrected yesterday, but using printer points instead. In my opinion, it’s a cleaner balance:
Before
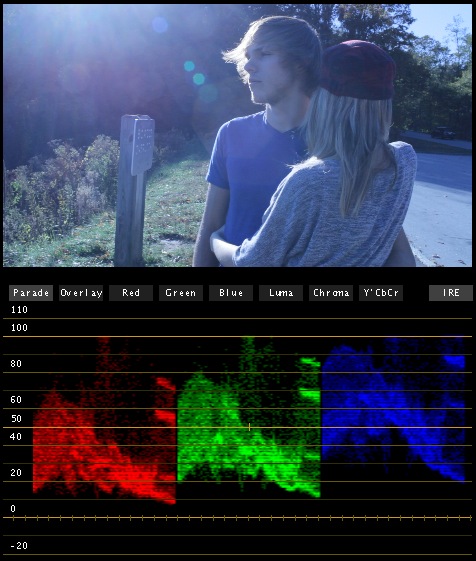
This shot has a blue color-cast. Look at the RGB parade and see how much higher the blue channel is.
After
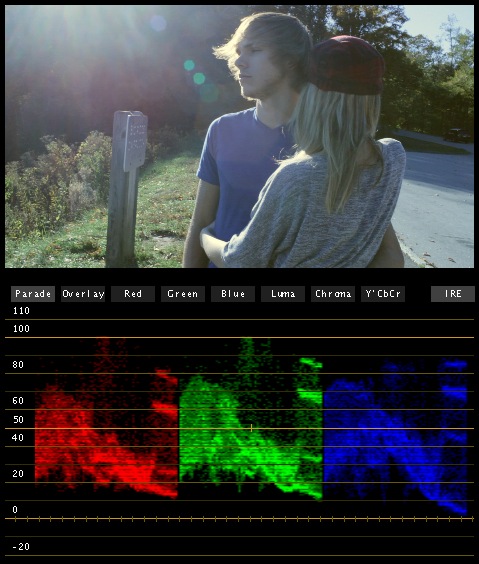
Corrected using only Printer Points

The adjustments for the above image


02/15/2011, 2:28 pm
Hi Aaron,
I tried to customize the keyboard on Apple Color and couldn’t find it.
Is Apple Color customizable to the Printer Points? If positive, how can I map it?
Thank you!
02/17/2011, 8:24 pm
Sadly, you can’t customize keys for Apple Color. This tip is from a Autodesk Lustre setup that had these keys mapped.
02/17/2011, 8:57 pm
:S
All right, I’ll wait untill I make money and buy some nice control surface! ;)
thanks for the answer!
10/03/2013, 5:50 pm
Resolve has printer points in Log mode – ctrl + Alt + ‘ or in the top menu > color option is near the bottom.
10/03/2013, 10:21 pm
You know, I’m actually going to be writing a post about that soon :)
10/08/2013, 4:10 pm
This is in fact a great tool! I couldn’t work without them in Lustre :)
11/15/2013, 4:30 am
thanks for your blog. It helped me a lot!
I would like too see printer lights controls in Resolve like the ones in Mistika. It’s far more useble. You can adjust black and white points independently so it’s easier to balance the shots. Overall I think that Mistika is the best cc tool on the market but it’s too expensive.
01/23/2015, 1:15 pm