The “Iso(lated) Color” look = key one color (often red) and desaturate the rest of the image to black and white, leaving the keyed color. This look can be very tricky, & production design is crucial. You’ll probably need to use shapes to isolate.
This is another special effect look. It’s been used in a few big-budget movies like Schlindler’s List and Pleasantville. Production design and pre-planning is crucial to pull off this look. Is the color you need to key red? Is someone else in the shot wearing something red or have really red hair? Is it green? Is there a lot of grass in the shot? Get the point yet? These things don’t make it impossible, but they sure do make it a lot easier!
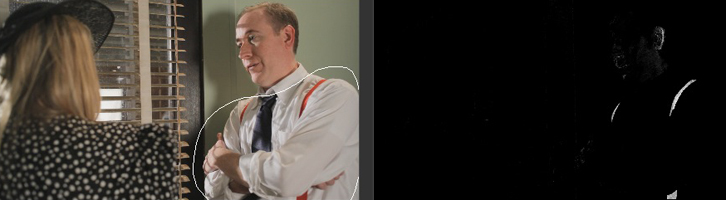
We’ll use this look as a chance to move into secondaries. Pulling a key is often used in secondary color correction, so this should be a good intro. We’ll start off with this shot:

The base image
I want to isolate his red suspenders. We’ll start by clicking on the eyedropper icon, then dragging across the suspenders.

The first key. Not very specific...

The matte pulled by the first key from the eyedropper.
Well that did a pretty suck-tastic job. It picked up the red in his skintones, which we don’t want. But, what it did do it give us a start. Now we’ll start adjusting the qualifier settings until we get a better key (the qualifier settings are the 3 horizontal strips next to the eyedropper). We’ll go more into how to use these in my next tip, but for now, just play around with them to get a feel for what they do. Keep adjusting till you get your color as isolated as possible. You can’t always get it totally isolated, but get it as much as you can. In this case, I was able to get it down to just the suspenders and a little bit of skintone on his ear:

My key settings

You can see the suspenders clearly, but i couldn't get that bit of his ear out...
That’s the best I’m going to get using just a key. Moving on, I went to the “outside” corrections and pulled the saturation all the way down, then boosted the “inside” correction satuartion to 1.5 to get a good preview of what the final image will look like:

Settings for "Outside" the key

Settings for "Inside" the key

Just gotta get rid of that bit on his ear...
The best way to get rid of that bit on his ear is to put a shape around his body. Since the key is pretty good, I don’t need to do a full rotoscope job, I just need a rough matte to exclude the ear:

A rough custom shape fixes the ear problem!

The final image!
This technique doesn’t always work so easily. In movies like Schindler’s List and Pleasantville, whole teams of roto artists worked to isolate the actors and colors. You should expect to use a combination of keying and shapes, even frame by frame roto if the shot is really tricky…
Needless to say, this technique varies for every shot and color, so sadly, I can’t really give you a preset for this. I’ll be posting more about secondaries, keying, vignettes, etc. starting tomorrow, so that should help.


02/16/2011, 2:37 pm
Hi Aaron,
Can I isolate two colors in the scene? For ex:
A girl walking wearing an yellow dress that I want to keep with the skin tone.
I know the color between yellow dress and skin is close, but can I really isolate theses colors separately?
And if the case is two different colors like blue and yellow? Is it possible to isolate?
thank you!!!
02/17/2011, 8:34 pm
You can’t really do that in Apple Color (maybe in very specific circumstances using the saturation curve tool, but that’s be rare).
DaVinci Resolve will let you do this using either parallel or layer nodes (layer if I remember correctly).
02/17/2011, 9:36 pm
Ow, what sad! waiting Apple Resolves™ this, hehe..
thanks!