I recently completed a project at my full-time job for KIPP Academy Nashville. I led the project from the initial client meeting to the planning to the shoot to post production, and it was wonderful working with a client that was really making a difference and changing lives, reminding me of the best part of my previous job at Biltmore Baptist.
One of my coworkers had been tasked with doing a behind the scenes case study and chose this project, so he asked me to do some screen recordings of the post production. I ended up recording most (but not all; I forgot a few times) of the work that I did, because I thought it would be cool to post the whole post-production process online in a time-lapse video. So, here you go:
And here’s the finished piece:
http://www.youtube.com/watch?v=oKHXJwiTHSI
For those curious, most of the interview footage and a little of the b roll was shot on a Sony F3 (direct to ProRes using an external recorder). The majority of the b roll and a few of the interviews that we had to do on pick-up shoot days we shot on a Canon 6D. As you can see, everything was edited in Premiere CS6, color graded in DaVinci Resolve 9, and the VFX and titles were done in After Effects CS6. I did use Lightroom for one thing: I was asked to end with a picture of the soon-to-go-to-college students from when they were at KIPP in 5th grade. The only picture they could provide was 500px wide. I brought the image into Lightroom, scaled it up, split toned it to make it look “old” like the client requested, then added a fair amount of large-scale grain to help mask the pixelation. The biggest thing I missed on this project was the color grading control surface; I had one at my old job, but I don’t have one here (yet, I hope!).
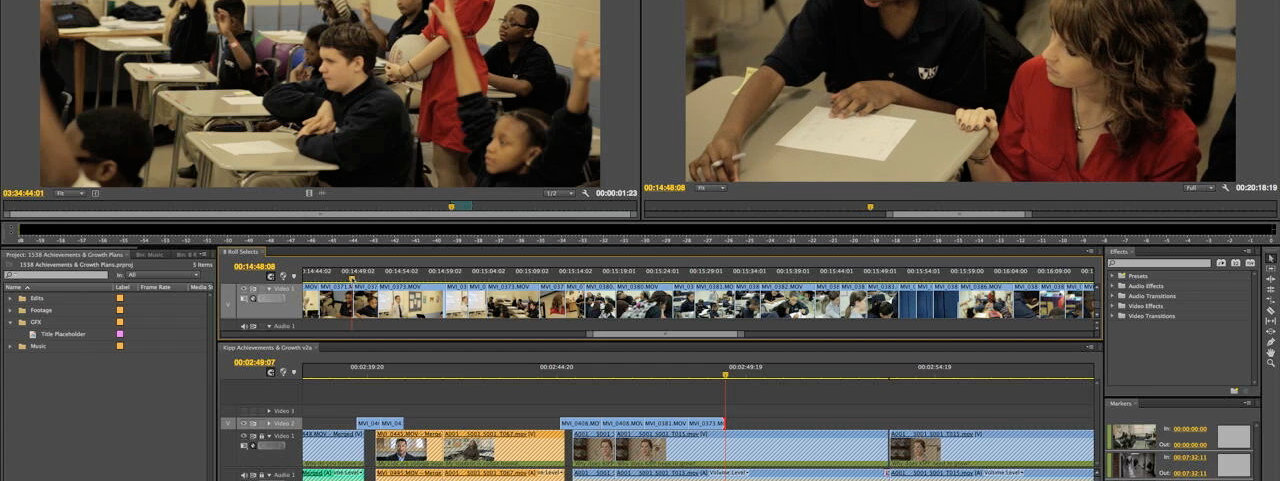
One thing you might notice during the editing section is that I lean more towards a traditional source/sequence editing style for the most part (Sorry! I know a timeline editing style would be more fun to watch in the time-lapse). There are times and occasions that I’ll do most of my editing in the timeline, and I usually do most of my trimming in the timeline using the mouse, but my initial build is very source/sequence based. I tend to stick to a small amount of tracks; in this case Track 1 is the interview footage, Track 2 is b roll, and Track 3 was used for title placeholders before I sent the timeline to After Effects. As far as sound, I usually send my audio to Audition (or Soundtrack Pro back in the day), but for this one I didn’t. That said, I’m not really a “sound guy”, so I’m sure it could still use some work in that dept., it’s just beyond my skill set.
Let me know if you have any questions in the comments. I’d be happy to answer them!


05/10/2013, 10:14 am
I have to say, your Premiere Pro setup gave me ‘Workspace Envy’. I like the idea of using the VU’s across the middle to free up space on the right hand side.
05/10/2013, 1:46 pm
I can’t take credit for that one :) I got that from an editor at Elevation Church in Charlotte, NC (You should check out their stuff. It’s absolutely outstanding!). I saw it and was like, “Genius!!”. I’ve got a couple different layouts, but I’ve made that a pretty consistent part of all of them.
05/13/2013, 11:26 am
I believe it will soon become part of mine too!
Some good stuff on Elevation’s website, too.
06/02/2013, 9:02 pm
Aaron, I really enjoyed reading this article. Seeing a write-up from start to finish of the process was extremely insightful. And I must say, I particularly enjoyed the subject matter. I’ve done video projects for the Tulsa, OK KIPP academy for the past few years. It’s always great to see how other KIPP’s are promoting and sharing the vision at KIPP. Thanks for this.
Here’s an example of one of Tulsa’s recent videos we created. https://vimeo.com/64180001
Cheers, Charles
06/03/2013, 11:07 am
Nice job Charles! Thanks for the link. It’s cool to see someone else’s take on a very similar project!
08/05/2013, 7:53 pm
Know anyone who has done this with FCPX? It would be extremely helpful, I imagine.
08/09/2013, 5:44 pm
You know, I haven’t really seen a ton of these around, and non from FCPx. Sorry!
08/29/2013, 2:39 pm
10/31/2013, 3:43 pm
11/01/2013, 8:27 am
Thanks for writing this up Aaron and also for the article on premiumbeat where you discuss how you use prelude. Can you say how you made the screen captures for the timelapse? I’m guessing you have something that takes a capture every few minutes? Or do you do it manually?
11/01/2013, 9:42 am
Glad you got something out of it! I used Screenflick for the screen recordings. It was great because it could record the whole screen but save to a downsized (720p) version to save me some file-space (which was necessary with so many hours of editing involved). It’s all regular screen recordings just sped up in the NLE, not a true “time-lapse” of multiple pictures over time.
11/01/2013, 8:26 pm
Aha! Just tried out Screenflick. Super software. Thanks for the tip. ps. really love your blog – busy reading everything on it. So very useful.
11/04/2013, 12:41 pm
Glad you like it! Thanks for the complement :)
12/03/2013, 11:34 am